This post might be created with help from AI tools and carefully reviewed by a human (Anthor Kumar Das). For more on how we use AI on this site, check out our Editorial Policy.
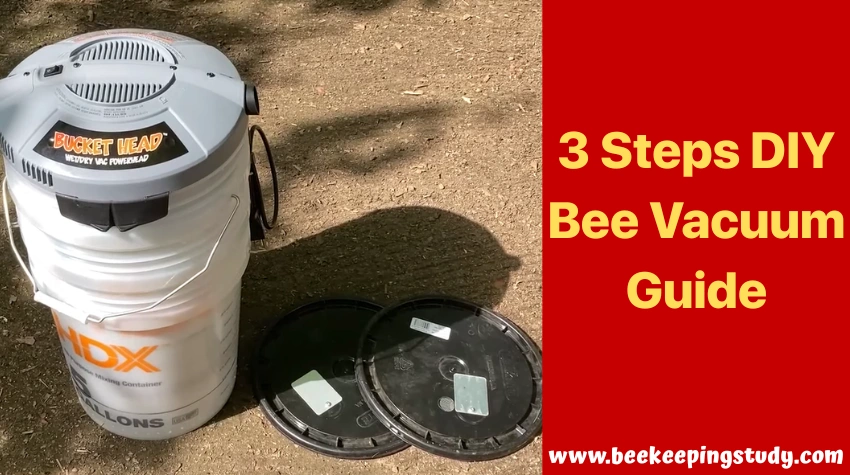
3 Easy Steps to Creating Your Own DIY Bee Vacuum in 2026
You are looking for a DIY Bee Vacuum guide mostly because you want to get rid of a honey bee swarm or want to relocate them. Then, you are in the absolutely right place.
Spotted a basketball-sized clump of buzzing bees on a tree branch or your fence post? Your first instinct might be panic, but your second is probably, “How do I get them to leave without hurting them?”
While a professional beekeeper is the best option, the cost can be a barrier. This guide will show you how to build a simple, safe ‘bee vacuum’ that offers the perfect middle ground: a humane solution that empowers you to solve the problem yourself.
A standard vacuum that we often use as a vacuum cleaner is a death sentence for honeybees. Unlike the gentle method we’re about to build, a shop vac is designed for high-speed destruction. The intense suction and violent journey through the hose are almost instantly fatal to their fragile bodies.
It’s a common misconception that suction is the only force at play. In reality, the high-speed impact is what ensures a tragic outcome for the colony.
This is where a specially designed bee vacuum, or DIY bee catcher, changes the game entirely. Instead of a violent tornado, this device creates a gentle breeze that simply nudges the bees off their perch and into a spacious, well-ventilated temporary home.
The core principle of these gentle bee collection methods is relocation, not extermination. The goal is to provide a calm, safe transport box from which the swarm can be given to a local beekeeper who can help them thrive.
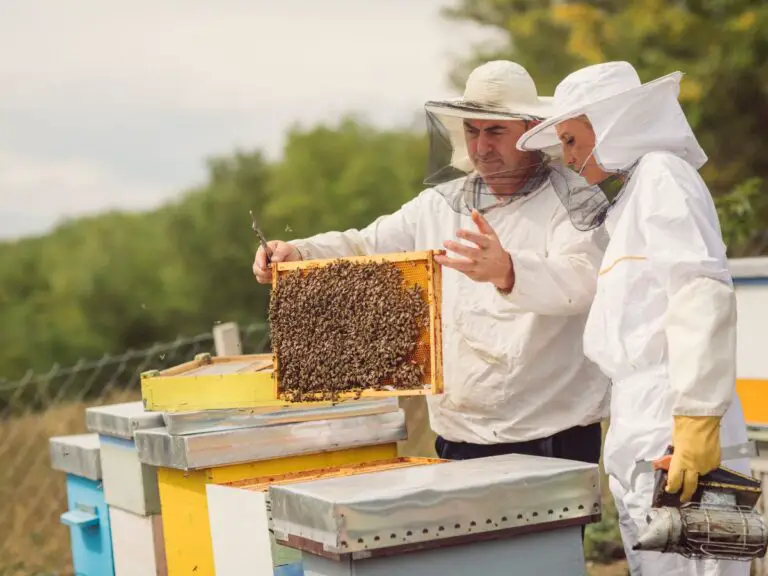
A bee vacuum is a popular tool for beekeepers as well. I also use bee vacuum to relocate bee swarms from different location.
In one of my previous article I shared 4 diy bee vacuum plans. In this article, I am going to share a complete diy bee vacuum guide for absolute beginners. Following these 3 easy steps, you will be able to create your own bee vacuum.
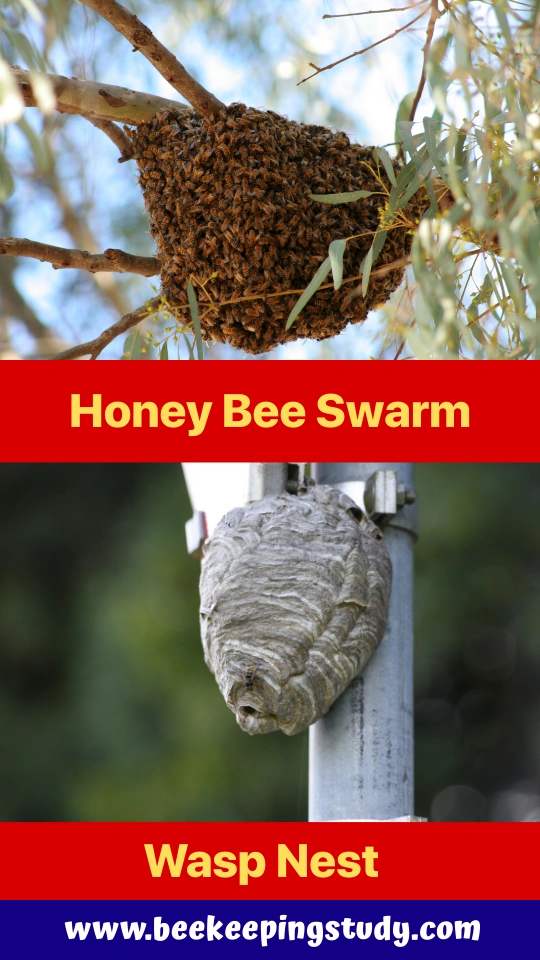
CRITICAL: Is It a Honeybee Swarm or Something More Dangerous?
Before you grab a single tool, you need to answer one crucial question. What exactly are you looking at?
This guide is designed for one situation only. Safely relocating a gentle honeybee swarm. Using it for aggressive wasps or hornets is extremely dangerous, and this bee-vac won’t work for them.
Proper bee identification is your first and most important step. You can easily do this by knowing the differences among different bee species and wasps.
A true honeybee swarm is a big, fuzzy, brownish-gold cluster of thousands of bees clinging to each other, usually on a tree branch or fence post. In contrast, a wasp or hornet nest is a structure, a papery, gray or tan home they have built, often under the eaves of a roof.
Think of it this way: a swarm is a living ball of bees, while a nest is the house they live in.
The difference isn’t just looks. It’s their behavior.
A swarm is a group of homeless bees looking for a new place to live, and they are typically quite calm because they have no home to defend.
Wasps and hornets, on the other hand, are aggressively protective of their established nest. Furthermore, a swarm is always external. If you see insects coming and going from a hole in your wall or attic, that’s a permanent colony, not a temporary swarm.
| Point of comparison | Honey bee swarm | Wasp swarm | Hornet swarm |
|---|---|---|---|
| What it usually means | A honey bee colony is moving to find a new home, usually with a queen and many workers. | Often a group of wasps gathering around a nest area or food source, or defending their nest. | Often hornets gathering near their nest, hunting, or defending a territory. |
| How it looks from far away | A loud cloud of bees, then a tight hanging cluster on a branch, pole, or wall. | Fast flying insects that do not form a large hanging cluster like bees. | Larger insects flying strongly near a nest area, often more spread out than bees. |
| Where you might see it | Tree branches, fences, car bumpers, walls, mailbox posts, or any place they can rest for a short time. | Near trash, sweet drinks, outdoor food, under roof edges, bushes, or near a nest entrance. | Near trees, roof spaces, sheds, wall voids, or near their paper nest. |
| Typical behavior around people | Usually calm if not disturbed. Most swarms are focused on protecting the queen and resting. | More likely to be defensive, especially if you are close to their nest or swat at them. | More likely to be defensive near the nest. Hornets can react quickly if threatened. |
| Risk level if left alone | Often low. Many swarms move on within a few hours to a couple of days. | Medium to high if they are nesting nearby or if people are close to the nest area. | Medium to high near the nest, especially in late summer when colonies are large. |
| What attracts them | A safe resting spot while scouts search for a new nest home. | Sweet foods, meats, trash, and sugary drinks. Also nest defense behavior. | Prey insects, meat, and defending nest territory. Some are drawn to sweet items too. |
| Nesting style | Wax comb inside a cavity like a tree hollow or wall space (after they move in). | Paper nests in the ground, wall voids, roof edges, or bushes depending on the species. | Paper nests, often larger, in trees, wall voids, roof spaces, or sheds. |
| Best safe response | Keep distance and do not spray. If it is in a risky spot, call a local beekeeper for swarm removal. | Do not swat. Move away slowly. If a nest is near people, contact a pest professional. | Give extra space. If a nest is near homes or walkways, contact a pest professional. |
| Easy ID tip | If you see a big hanging cluster, it is very often a honey bee swarm. | Wasps usually look smoother and more shiny, and they do not hang in a big beard cluster. | Hornets are larger than many wasps, and they often stay near a paper nest area. |
So, the rule is simple: if the insects are not fuzzy honeybees in an open-air cluster, or if they are inside any structure, stop and call a professional. For your safety, do not proceed. But if you’ve confirmed you have a docile honeybee swarm, you are ready to build a bee vac designed specifically for their safety.
Why Your Shop-Vac Is a Bee-Killer (And How This Design Is Different)
Grabbing your shop-vac might seem like a quick fix, but for honeybees, it’s a death sentence. Imagine trying to catch butterflies with a leaf blower. The result is a violent mess.
A standard vacuum is designed for destruction, using a trio of forces that are lethal to delicate insects:
- High-speed impact.
- Intense pressure changes.
- A cramped, suffocating space.
Our DIY bee vacuum is engineered to be safe for bees precisely because it solves these three problems.
Here’s how our design is fundamentally different from a shop-vac:
- Space: A large, ventilated box versus a tiny, airless bag.
- Suction: A gentle, controllable pull versus a high-power tornado.
- Impact: A long hose for a slow-down runway versus a high-speed collision.
Using a roomy collection box and a special valve to dial the power way down, we ensure the bee vacuum won’t kill bees. We are gently nudging them.
The long, smooth hose gives them time to slow down before they arrive safely in their spacious temporary home. This setup is the key to how a bee vacuum works without harming the colony. Now that you understand why we need a special tool, let’s gather the parts to build one.
Your Shopping List: Gathering Parts for a Humane Bee Catcher
The great news is that all the materials for this homemade bee vac are available in a single trip to any large hardware or home improvement store. You don’t need specialty parts. This entire project should cost between $40 and $60, making it a budget-friendly alternative to a professional call-out.
Here is everything you’ll need to grab. These bee vacuum plans and designs rely on common plumbing and hardware components.
- One 5-gallon bucket with a sturdy, sealable lid. This will be the bees’ spacious temporary home.
- 8 to 10 feet of 2-inch flexible sump pump hose. This acts as a long, gentle runway for the bees.
- One 2-inch PVC gate valve. This is the most crucial part; it’s the “dimmer switch” that lets you control the vacuum’s power.
- Two 2-inch PVC elbow joints.
- A small piece of window screen or metal hardware cloth. This provides vital ventilation.
- A handful of small nuts, bolts, and washers. To secure the screen.
- Silicone sealant. For creating an airtight seal on your DIY bee vacuum bucket.
3 Easy Steps DIY Bee Vacuum
Once you have your parts laid out, you’re ready to begin the assembly. Let’s start with the most important piece: the collection box itself.
Step 1: How to Build the Bee Collection Box
Begin with the heart of our project: the 5-gallon bucket that will become the bees’ safe, temporary home. Start by taking the bucket’s lid and, using your drill and a hole saw bit that matches your 2-inch PVC parts, carefully cut two holes.
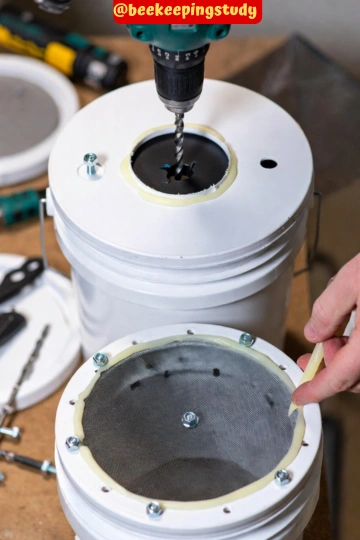
One hole should be in the very center of the lid, and the other should be near the edge. These two openings are the entrance and exit for the airflow we’ll use to gently guide the bees.
The single most important feature that protects the bees is an internal screen. On the underside of the lid, you need to install this screen over one of the holes.
This simple barrier is what separates a humane bee catcher from a deadly household appliance. It allows air to be pulled through the bucket while physically stopping the bees from getting sucked into the shop vac.
Place your piece of window screen or hardware cloth over the hole you drilled near the edge, securing it with small nuts and bolts. This ensures air can get out, but the bees stay safely in the bucket.
With the lid prepared, turn your attention to the bucket itself. A sealed container full of thousands of living creatures will run out of air surprisingly fast. To prevent this, add ventilation.
Using a quarter-inch drill bit, create a dozen or so small air holes around the upper portion of the bucket, about two inches below the rim. This provides essential, passive airflow that keeps the colony calm and healthy after capture, especially on a warm day.
Finally, to make sure your homemade bee vacuum works efficiently, you’ll want to ensure all connections are airtight. Run a bead of silicone sealant around the edges of the screen and anywhere else you see a potential gap on the lid.
Once you snap the finished lid onto your ventilated bucket, you’ll have a completed collection box. You’re now ready to build the plumbing that provides the all-important gentle suction control.
Step 2: Creating the All-Important Gentle Suction Control
With your collection box ready, it’s time to build the control system. This is the most crucial part of any DIY honey bee vacuum, as it’s what makes the entire process gentle and safe for the bees.
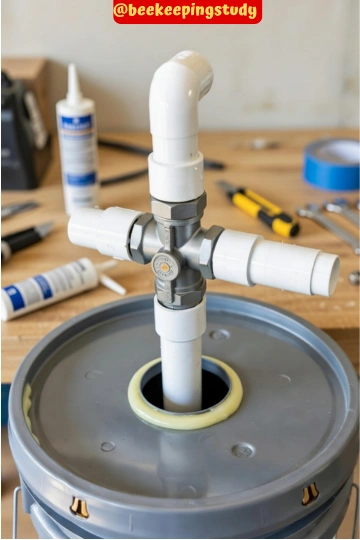
The key component here is the gate valve, which acts like a dimmer switch for your shop vac’s power.
A regular vacuum is far too powerful and would harm the bees on impact. By installing this simple valve, you gain precise control over the airflow, allowing you to create a light, gentle breeze that nudges the bees into the hose rather than violently sucking them in.
To assemble this control unit, you’ll work with the PVC parts. Start by connecting one of the 90-degree elbows to each side of the gate valve.
These elbows will direct the airflow, with one pointing up to connect to your shop vac and the other pointing horizontally to connect to your bee collection hose.
For now, just push the pieces together firmly. This simple T-shaped assembly is the central hub of your entire bee vac gate valve system.
Now, carefully insert the downward-facing end of your PVC assembly into the unscreened center hole you drilled in the bucket lid. It should be a snug fit.
To ensure your suction control works perfectly, you must make this connection airtight. Apply a generous bead of silicone sealant around the point where the PVC pipe meets the plastic lid, both on top and on the underside. Any air leaks will weaken the suction and make it difficult to control.
Once the sealant is in place, you’ve successfully created the brains of the operation, turning a powerful shop vac into a precise tool for humane bee relocation.
Step 3: Putting It All Together and Performing Final Checks
With your lid assembly fully cured, it’s time to connect the hoses. Attach your long, flexible hose to the screened PVC elbow on the side of the lid; this is the hose you’ll use to gently collect the bees.
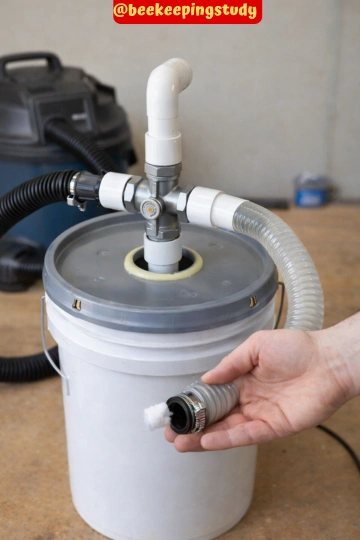
Next, connect a shorter hose from your shop vac to the upward-facing PVC pipe on your gate valve. Push both hoses on as far as they’ll go to create a tight connection. This simple configuration is a core element in many successful DIY bee vacuum plans, ensuring the bees land safely away from the vacuum’s motor.
Before you power it on, take a moment to double-check all your connections. For this homemade bee swarm catcher to work efficiently, the entire system must be airtight from the tip of the collection hose all the way to the shop vac.
Any leaks in the lid, hose fittings, or PVC joints will steal suction power.
Think of it like trying to drink through a straw with a hole in it. You get more air than liquid. If a connection feels loose, a tight wrap of duct tape can provide a quick and effective seal.
Finally, it’s time for a test run (without any bees, of course).
Place the lid securely on the bucket and make sure it’s sealed. With the gate valve completely closed, turn on your shop vac.
You should feel almost no suction at the end of the long hose. Now, slowly open the valve and notice how the airflow increases.
Try to pick up something very light, like a cotton ball or a dry leaf. Your goal is to find the sweet spot where the object lifts gently without being violently whipped into the hose. Getting a feel for this control now is the most important preparation you can do.
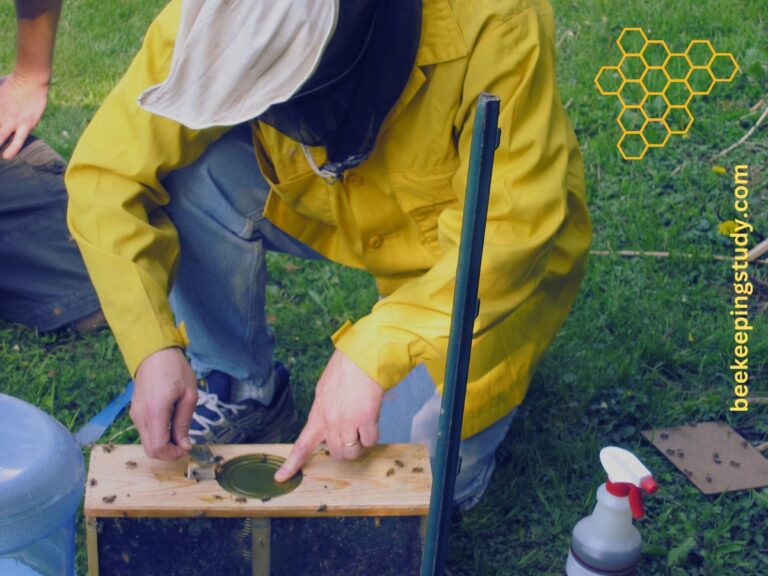
How to Use Your Bee Vacuum: A Step-by-Step Guide to Safe Swarm Collection
With your bee vac tested and ready, the final and most important step before you head outside is your own safety. Even though resting swarms are typically docile, you must wear the proper Personal Protective Equipment (PPE).
This isn’t negotiable. At a minimum, you will need a beekeeper’s veil to protect your face and neck, thick gloves that a stinger can’t easily penetrate, and long, light-colored clothing that covers you completely. This gear protects you from accidental stings if a bee gets startled or tangled in your clothes.
Remember that cotton ball test from the previous section? The same principle of using just enough power is the secret to catching a bee swarm with a vacuum humanely.
The key is to always start with zero suction and build up slowly. Jamming the hose into the swarm with the vacuum at full blast will injure or kill the bees and make them defensive. Your goal is to create a gentle breeze, not a violent tornado.
Follow these steps for a calm and successful collection:
- Gear Up. Before you do anything else, put on your full set of protective equipment.
- Position and Start. Place the collection bucket on stable ground near the swarm. Turn on your shop vac with the gate valve fully closed.
- Adjust Suction. Very slowly, begin to open the gate valve. Watch the bees at the very edge of the cluster. Stop opening the valve the moment you see a few of them gently lift off and travel down the hose. This is your “sweet spot.”
- Guide the Bees. Using the end of the hose, gently “brush” the surface of the swarm. Don’t jab it into the center. Let the gentle airflow peel away the outer layers of bees.
- Be Patient. Once the main mass of bees (including the queen) is inside, the remaining stragglers will often smell her and march into the hose on their own.
The best gentle bee collection methods rely on coaxing, not force. Think of the airflow as an invisible hand guiding the bees into their temporary home. As you work, you’ll see the bees begin to re-cluster inside the ventilated box, drawn together by instinct.
Once the buzzing from the collection box is strong and the branch is nearly clear, you can close the gate valve completely and turn off the vacuum. Congratulations, you’ve successfully and humanely collected a swarm! Now comes the crucial final step: getting them to a new, permanent home.
The Final Hand-Off: Finding a Home for Your Bees
A bucket full of buzzing bees is a living, breathing resource, and your final responsibility is to get it into the hands of someone who can give it a proper home.
The best time to arrange this is before you even turn the vacuum on.
Local beekeepers are often thrilled to take a free, healthy swarm, as it saves them the significant cost of buying a new colony. They don’t see a pest problem; they see a gift. Planning the hand-off ensures the bees you worked hard to save complete their journey successfully.
Finding a beekeeper is easier than you might think. Your most powerful tool is an internet search. Simply typing “[Your County] Beekeepers Association” or “bee swarm collection [Your Town]” will almost always lead you to a local club or a list of “swarm collectors” who have signed up specifically for this purpose.
Many associations run a swarm hotline during the spring and summer. A quick post in a local gardening or homesteading Facebook group can also yield surprisingly fast results from enthusiastic beekeepers nearby.
Once you have the bees contained and are waiting for pickup, their needs are simple. Move the collection bucket to a quiet, shady spot out of direct sunlight.
A garage or a covered porch is perfect. The bees can easily overheat in a sealed container, so keeping them cool is the single most important thing you can do.
Ensure the ventilation holes you drilled are clear and not blocked by anything. The bees will be fine without food or water for the 24-48 hours it typically takes to arrange a new home.
With a beekeeper on the way, you’ve successfully managed a tricky situation with a positive outcome for both you and the bees. This humane approach solves your problem while supporting local agriculture and the environment.
Troubleshooting Your Bee Vac: Real-Time Adjustments
Even with a perfect build, using your bee vacuum is more like steering a boat than flipping a switch; it requires small, real-time adjustments.
Your ability to “read” the situation and react is what makes this a safe and effective tool. If things aren’t going smoothly, don’t panic. This quick DIY bee vac troubleshooting guide covers the most common issues you’ll encounter.
- Problem: Bees aren’t gently lifting off the cluster and into the hose.
- Solution: Your suction is too low. Open the gate valve a tiny bit more, wait a moment to see the effect, and repeat until you get a gentle flow of bees.
- Problem: The bees seem highly agitated, are spinning violently, or worse, are being harmed.
- Solution: Your suction is too high! This is the most critical of all bee vacuum problems. Immediately close the gate valve to reduce the power to a gentle pull.
- Problem: Suction feels weak even with the gate valve wide open.
- Solution: You almost certainly have an air leak. Turn the vacuum off and firmly press down on the bucket lid to ensure it’s sealed tight. Also, check that your hose connections are snug.
Mastering these quick fixes ensures you have the control needed for a humane and successful rescue.
Congratulations! You’ve Just Rescued a Bee Colony
Take a look at your clear yard and listen to the calm, buzzing bucket. You did it.
A short while ago, you faced a daunting problem. Now, with a few common materials and a bit of ingenuity, you’ve built the solution.
You’ve gone from seeing an intimidating swarm to safely and humanely collecting one, a skill you didn’t have an hour ago.
Your success wasn’t an accident; it was by design. You understand the core principles of a DIY bee rescue: that a gentle breeze is better than a violent gale, and that bees need space and air to remain calm.
This knowledge is the key that transforms a simple tool into an effective conservation device, allowing you to confidently manage the situation.
Don’t forget to share your feedback about this DIY bee vacuum method.